Create your First App on Flutter
Now, that we have finally done setup and configuration, we are ready to get started with Flutter Development and build our first app.
In this app, I will cover the basic concepts of Flutter. So, Let’s jump right into our Editor.
Flutter New Project Setup
Firstly, we will open VSCode and then open the command palette & type Flutter Project.

Then, we click on Application, and then it will ask for the folder where the project should be saved.

Then it will ask for the project name & after that, it will create a flutter project for you. Just wait a while.

Once everything is set, expand the lib folder and double-click on the main.dart file. This is the starting code written by Flutter Team which is a counter app. We have already run this app in Android Studio installation time. Now, we have to erase all code to start from scratch.
Just simply type import and type material & it will auto-complete the sentence.
import 'package:flutter/material.dart';Material Widget
After that, simply write void main() => runApp & inside runApp, simply type Material App because we have to build a blank Material App and this conforms to Material Design Pattern.
void main() => runApp(MaterialApp());Actually, this material design is created by Google & a lot of apps have adopted it.
So, by using Flutter, we have a wide variety of material components we can embed in our project. We will see different flutter widgets in a while.
Now that we have written Material App, we can start building a widget tree in it. So, the most important thing we can set is Home & this is where everything gets started. So, in our home, we want to see a Text widget that will say Hello World.
void main() => runApp(MaterialApp(
home: Text("Hello World!"),
));
Now, if we want to run our app, it will appear like this.

It shows the text inside our Material App & at this moment, it’s not looking great. It’s just a black screen with an awkward position which is overlapping with our notification bar.
Right now, there are two widgets. The parent widget is the Material App, and all of your Flutter App will start from Material Widget & right now, we are simply showing Text Widget inside Material App & by default, text widgets get aligned on the top of the screen. This is why we are seeing it right up there.

So, now if we want to centralize our Text widget, then we will write Center (child: ()).
void main() => runApp(MaterialApp(
home: Center(child: Text("Hello World!"),)
));
So, now it’s under the Center hierarchy. So, you can see that the center widget is responsible for laying out the screen, and helping it to put something right in the center & the Material App will be always on the top of all the widgets.

Now at the moment, our code is all on the same line and it’s hard to read it properly. So, we will put commas on every end of the small bracket and then we will format the document then our code will appear like this which makes it readable.

So, now you will see that everything lies inside the main function. When our app is run, the starting file is main.dart file. So, it launches this app, & this starts from the top. It looks for something called main & then it will look to see what it should do. This is the starting point of all apps.
You can collapse each widget like this and you can see that the Flutter extension guides us at which line widget is ending.
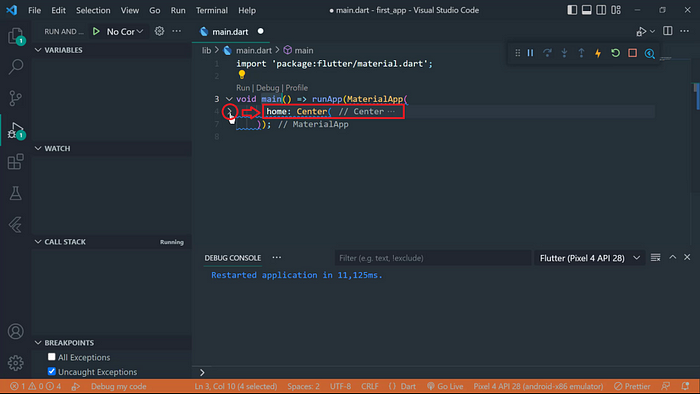
Also, we can add comments like this so that our future self can remember why we wrote this line of code, or if you are working with a team then you can explain to your teammate.

So, now we have reached that point where we have to build a beautiful interface.
Scaffold Widget
So, for that, we will create a scaffold in this Material App so that we can have an App Bar, and Floating Action Button if we want to & I recommend reading Scaffold documentation so that you can know what the scaffold widget can do.

Instead of having a center widget in our home widget. We will write a scaffold here.
After that, we will write App Bar Widget, a pre-built widget material design, and it will add on top of the screen and have different properties like background color, and title. So, we will add a title to it, and set the background color.
void main() => runApp(
      MaterialApp(
          home: Scaffold(
          appBar: AppBar(
            backgroundColor: Colors.amber,
            title: Text('Jbtronic'),
        ),
));
Now, if we want to change the background color of an app then we will add a background-color property to it. So, now you can see that it looks something nicer.

Now, if we want to add an image in our app, then we will add the body property and insert Network Image in it.
Right now, I’m adding images via the Internet & in my next video, I will tell you how to add images from your local folder.
So, now this network image requires a URL. So, we will head towards Google and type Network Image Flutter and go to the first link and copy the URL & paste it into your Network Image URL.

You can see that we have to insert a URL with a single quote when we are using dart. While in other programming languages like JAVA or Swift, we have to use double quotes. So, keep that in mind.
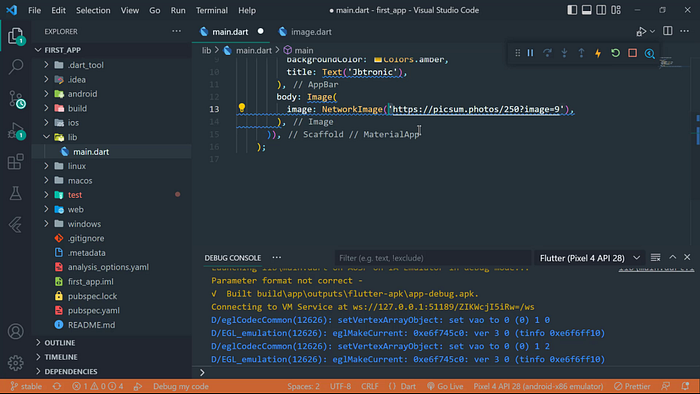
Now, we are telling our code to fetch image from this URL. So, now if we hit play then it will show us the image right in the body of an app.

So, now if we want to centralize this widget then I will tell you a shortcut that will make it super easy for you.
Simply, right-click on Image and click refactor and select wrap in the center widget & it will automatically render it.

Now, if we hit the play button, you can see that your image is centralized.

So, this is enough for this module. We have learned a lot of things like how to use Scaffold, how to use App Bar, how to add background color in our app, and how to add images.

Right now, our app hierarchy looks like this. Our Material App is on top, then Scaffold. After that, we added a background color to Scaffold Widget. Then we have an App Bar which contains Colors and a Text Field. Also, in Scaffold Widget, we have used Center Widget which contains the Image which is Network Image.
Code
import 'package:flutter/material.dart';
//Starting point of a code.
void main() => runApp(
      MaterialApp(
          home: Scaffold(
            backgroundColor: Colors.amber,
        appBar: AppBar(
          backgroundColor: Colors.amber,
          title: Text('Jbtronic'),
        ),
        body: Center(
          child: Image(
            image: NetworkImage('https://picsum.photos/250?image=9'),
          ),
        ),
      )),
    );
GitHub Repo
You can download my code from my GitHub: https://github.com/jaybee98/Flutter-Youtube-Tutorial/tree/main/first_app